Customizing RISAConnection
You may customize several of the default parameters, and Preference options in RISAConnection. In this way you can modify the program so that it best suits you and your work processes. The Preferences option on the Tools menu provides you control over the behavior of the software. All customization may be defined or redefined at any time.
Preferences
Preferences options may be accessed by selecting Preferences from the Tools menu and are divided into the sections described below.
General Tab
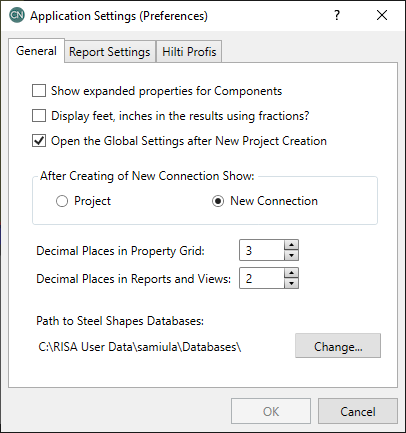
The General tab of the Preferences dialog contains options that are generally straightforward and can be easily set to customize the program with every new model you create.

- The Show Expanded Properties for Components checkbox allows the user the option to expand the component information in the Connection Properties input. If this box is checked, the Components section of Connection Properties will expand to show all the section properties of your selected element (Column, Beam, Plate, etc.). If not checked, this section will condense down to just the editable properties (shape, material, etc.).
- The Display Feet, Inches in the Results Using Fractions checkbox allows the user control over the display of the results. If this is checked, results will display in fraction format. If it is unchecked, then they will be displayed in decimal format.
- The Open Global Parameters After New Project Creation checkbox controls whether or not the Global Parameters dialog box is automatically displayed to you when you start a new Project file. If this is left unchecked, then this dialog will not automatically open when you start a new model.
- The New Connection options allow the user to set what is displayed to you after a new Project is created. You can choose to show the entire Project ( the main window will display thumbnails of each Connection that you have created) or automatically create a New Connection for you which you can then build into your Project.
- The Decimal Places entries allow the user control over the number of decimals that are shown in the Property Grid (Connection Properties spreadsheet) and the dimension values shown in the Reports and Views.
- The Path to Steel Shapes Databases shows where the program is looking for the shapes databases that it reads into the program. If your databases are not located in this path, you must either change the patch or move the databases to this directory.
Report Logo Tab
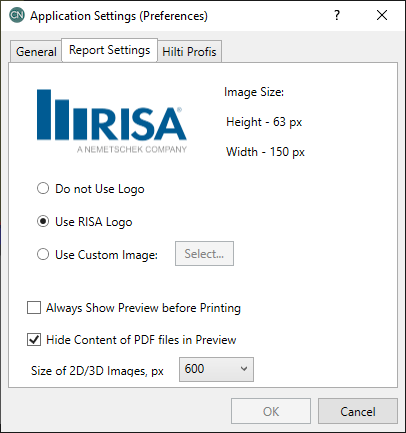
The Report Logo tab of the Preferences dialog contains options for the user to upload a company logo to include with the printed output. This image will then be displayed at the top of the design report.

- The Do not Use Logo selection leaves the logo display blank.
- The Use RISA Logo selection uses the RISA logo for display on the report, both within the program and on the printed report.
- The Use Custom Image allows you to select your own custom logo to display on the report, both within the program and on the printed report.
- The Always Show Preview before Printing check-box allows the user to include a Print Preview within the Report Printing dialog.
- The Hide Content of PDF files in Preview check-box allows the user to hide the additional PDFs in the Report Printing Print Preview (this helps display the preview quicker).
- The Size of the 2D/3D Images menu allows the user to adjust the size of the images included in the printed report.
Hilti Profis Tab
The Hilti Profis tab of the Preferences dialog allows users to designate the directory for saving Hilti Profis calculation reports. This setting ensures that anchorage analysis results exported from Hilti Profis are stored in the specified user-defined location.


